
Web App Development Tools: Scaffolding Web Apps with Yeoman
When creating high-quality web applications, it's important to make sure that your toolset is ready to bring your A-game as a web app developer. Yeoman is a tool that allows us to kick-start all kinds of projects easily. In a matter of seconds, you end up with the skeleton of an application ready so you can start coding right away.

Why should you use it Yeoman?
Well, having an efficient workflow is a key step in a modern web app development process. Why spend time and effort creating every single file and folder from scratch on every new project you work on? You may think saving snippet files and copy and pasting from older projects is the efficient way. Just wait until you try Yeoman.
Maybe you already are using some tools as part of your workflow. Are you using livereload to automatically send your changes to the browser? Cool! Are you minifying your files before moving them to production? Great! Are you linting your files before checking in your files? You should! Now, how do all those tasks fit together? Are you running each manually? This is where a tool like yeoman comes in handy.
Creating a good workflow is not always straightforward, so get some help from experts! Yeoman tasks are created by some of the best developers in the industry like Paul Irish, Addy Osmani, and Sindre Sorhus.
Getting Started
Yeoman is a Node package, so it requires to have installed at least version 0.10.0, along with its package manager npm. Yeoman work together with two other great tools: Grunt and Bower, but installing Yeoman will also install them if you don’t have them already, so don’t worry about it.
Using npm we run:
> npm install -g yo |
Yeoman, Grunt and Bower are now installed. But we’re not there yet! To start initializing projects we would need to install GeneratorsWe can run this from any directory. Since we are passing the global flag the package is going to be installed in the node path.
Generators
Generators are add-ons that tell Yeoman what is needed to be done in order to generate a we application. There are hundreds of generators ready to be used. The cool thing about generators is that anybody can create their own. If you’re interested, there’s an official tutorial.
With so many generators chances are, you can find one that fits your needs. Backbone? Checked. AngularJS? Yes. Chrome extensions? Sure! You can search for them using npm:
| > npm search yeoman-generator |
That will give you a list of every package in the npm registry with the tag “yeoman-generator”. If you prefer a nicer interface try searching on the npm registry where you can also find links to most project sites or repositories.
Once you have chosen one, install it:
> npm install -g generator-backbone |
Some generator packages will register several sub-generators. To list them all, execute:
> yo --help |
That’ll give you a list of everything you can use:
Backbone backbone:all backbone:app backbone:collection backbone:model backbone:router backbone:view Backbone-mocha backbone-mocha:collection backbone-mocha:model backbone-mocha:router backbone-mocha:view Mocha mocha:app |
Usage
Now we’re ready to generate! Create and/or move to the folder you want your app to be:
> mkdir backboneapp && cd backboneapp |
Then execute the generator
> yo backbone:app |
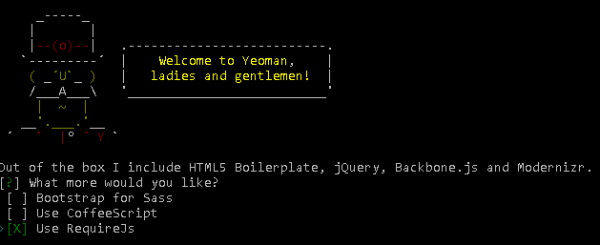
You’ll be received by our new friend, Yeoman. He will inform you what will be installed and shows you other options to add.
Next, Yeoman will start its magic. Creates every file and directory you’ll need:
- - A main app folder, which contains everything but config files.
- - An image folder
- - A scripts folder
○ Subfolders for backbone collections, models, routers and views.
○ Subfolder for templates using on the client side.
- - A style folder for your css files.
- - A test folder for mocha tests.
It also creates config files including three very important:
- package.json: Contains all the information that describes our application as a node package, including what dependencies it has.
- bower.json: Lists the front end components our app needs.
- Gruntfile.js: The configuration file of our task runner.
Yeoman will automatically try to fetch all your dependencies by automatically running:
> npm install > bower install |
If it fails to do this (most of the time it won't) just run those commands yourself.
At this point you are ready to start working. Simply run any of the default Grunt tasks (described below) and you can start with what you really want to do, code your app.
> grunt server > grunt build > grunt test |
Now let's see what’s under the hood.
Dependency Management & Tasks Runner
Dependency Management: Bower
Bower is a great tool for managing front-end assets such as web fonts, javascript libraries, icon sets, etc. I won’t go into much detail here because that deserves its own blog post. If you open the file bower.js you’ll see all the dependencies your application has at the moment.
{
"name": "backboneapp", "version": "0.0.0", "dependencies": {
"jquery": "~2.1.0", "underscore": "~1.6.0", "backbone": "~1.1.0", "requirejs": "~2.1.10", "requirejs-text": "~2.0.10", "modernizr": "~2.7.1" }, "devDependencies": {}
} |
Following npm style, we can search, install and uninstall dependencies using the command line:
> bower search bootstrap > bower install bootstrap > bower uninstall bootstrap |
Task Runner: Grunt
Finally, we have Grunt. Instead of explaining how Grunt works, I’ll point you out to an excellent article a good friend of mine published here a few weeks ago: Introduction to GRUNT, a JavaScript Task Runner
Yeoman writes for us a set of awesome and helpful tasks. They’re all preconfigured but still easily customized. Some of them are:
- grunt server: It will start a server instance, open a browser tab pointing to this server, watch all the files for changes in real-time and reload those files in the browser automatically on each file change.
- grunt test: It will start a server instance, open a browser tab pointing to it, run our whole suite of Mocha tests, watch for changes in the files and report back to us the results of those tests.
- grunt build: It will do a bunch of optimizations to the files; minification of css, javascript and images, concatenation of css and javascript, copy files to a distribution folder, etc. You end up with a version of your app ready for production.
- grunt jshint: runs jshint and shows a detailed report on all the error it found.
Final thoughts
As you can see, it only takes a few seconds to pass from zero to the bare bones of your next app. Improving your workflow can make a big difference in your efficiency. I urge you to try Yeoman. Dive into its tasks, see what you can learn from them, what you can improve for your particular situation, and come up with a workflow that fits all your needs.
About The Author
Celso Juarez is a Software Engineer with 3+ years of experience with web development. He's specialized in Front-end Development.


Post Your Comment Here