
Android App Development: Creating a Google Glass Application
In this post, we'll go through how to create an application for sharing photos between Google Glass and Android Devices (such cell phones and tablets). For all of you Android App Developers, all the code can be found on the GitHub repository, and it's open for access and improvements.
One of the main features that Google Glass lacks is the option to share photos between paired devices through Bluetooth. Keeping that in mind, the original intent of the application was adding the functionality to share a picture taken from the native camera using Bluetooth. Nevertheless, given that the GDK is on a very early stage, it doesn’t allow us to implement this kind of behavior. So the original idea had to be expanded, this is, showing a camera preview, take a photo, and share it through Bluetooth.
Given this, the application is composed by:
- Client Application in Google Glass.
- Server Application Service in an Android Device. This application is in charge of listening and accepting Bluetooth petition from Google Glasses.
Client application
This application will be in charge of the logic related to the Camera handling and the initial communication with the server device. Given this, the first screen that a user must see is a camera preview. This step is pretty much straightforward; a wrapping class extended from a SurfaceView will handle the entire task:
<span style="font-size: 14px;">public class CameraView extends SurfaceView implements SurfaceHolder.Callback</span> <span style="font-size: 14px;">{</span>
<span style="font-size: 14px;"> private SurfaceHolder surfaceHolder = null;</span> <span style="font-size: 14px;"> private Camera camera = null;</span>
<span style="font-size: 14px;"> @SuppressWarnings("deprecation")</span>
<span style="font-size: 14px;"> public CameraView(Context context)</span> <span style="font-size: 14px;"> {</span>
<span style="font-size: 14px;"> super(context);</span> <span style="font-size: 14px;"> surfaceHolder = this.getHolder();</span> <span style="font-size: 14px;"> surfaceHolder.addCallback(this);</span> <span style="font-size: 14px;"> surfaceHolder.setType(SurfaceHolder.SURFACE_TYPE_PUSH_BUFFERS);</span> <span style="font-size: 14px;"> }</span>
<span style="font-size: 14px;"> @Override</span> <span style="font-size: 14px;"> public void surfaceCreated(SurfaceHolder holder)</span> <span style="font-size: 14px;"> {</span>
<span style="font-size: 14px;"> camera = Camera.open();</span>
<span style="font-size: 14px;"> // Set the Hotfix for Google Glass</span> <span style="font-size: 14px;"> this.setCameraParameters(camera);</span>
<span style="font-size: 14px;"> // Show the Camera display</span> <span style="font-size: 14px;"> try</span> <span style="font-size: 14px;"> {</span>
<span style="font-size: 14px;"> camera.setPreviewDisplay(holder);</span> <span style="font-size: 14px;"> }</span> <span style="font-size: 14px;"> catch (Exception e)</span> <span style="font-size: 14px;"> {</span>
<span style="font-size: 14px;"> this.releaseCamera();</span> <span style="font-size: 14px;"> }</span> <span style="font-size: 14px;"> }</span>
<span style="font-size: 14px;"> @Override</span> <span style="font-size: 14px;"> public void surfaceChanged(SurfaceHolder holder, int format, int width, int height)</span> <span style="font-size: 14px;"> {</span>
<span style="font-size: 14px;"> // Start the preview for surfaceChanged</span> <span style="font-size: 14px;"> if (camera != null)</span> <span style="font-size: 14px;"> {</span>
<span style="font-size: 14px;"> camera.startPreview();</span> <span style="font-size: 14px;"> }</span> <span style="font-size: 14px;"> }</span>
<span style="font-size: 14px;"> @Override</span> <span style="font-size: 14px;"> public void surfaceDestroyed(SurfaceHolder holder)</span> <span style="font-size: 14px;"> {</span>
<span style="font-size: 14px;"> // Do not hold the camera during surfaceDestroyed - view should be gone</span> <span style="font-size: 14px;"> this.releaseCamera();</span> <span style="font-size: 14px;"> }</span>
<span style="font-size: 14px;"> public void setCameraParameters(Camera camera)</span> <span style="font-size: 14px;"> {</span>
<span style="font-size: 14px;"> if (camera != null)</span> <span style="font-size: 14px;"> {</span>
<span style="font-size: 14px;"> Parameters parameters = camera.getParameters();</span> <span style="font-size: 14px;"> parameters.setPreviewFpsRange(30000, 30000);</span> <span style="font-size: 14px;"> camera.setParameters(parameters); </span> <span style="font-size: 14px;"> }</span> <span style="font-size: 14px;"> }</span>
<span style="font-size: 14px;"> public void releaseCamera()</span> <span style="font-size: 14px;"> {</span>
<span style="font-size: 14px;"> if (camera != null)</span> <span style="font-size: 14px;"> {</span>
<span style="font-size: 14px;"> camera.release();</span> <span style="font-size: 14px;"> camera = null;</span> <span style="font-size: 14px;"> }</span> <span style="font-size: 14px;"> }</span> <span style="font-size: 14px;">}</span> |
Which can be easily implemented within an activity using the “setContentView” method as follows:
<span style="font-size: 14px;">@Override</span> <span style="font-size: 14px;">public void onCreate(Bundle savedInstanceState) {</span>
<span style="font-size: 14px;"> super.onCreate(savedInstanceState);</span> <span style="font-size: 14px;"> getWindow().addFlags(WindowManager.LayoutParams.FLAG_KEEP_SCREEN_ON);</span>
<span style="font-size: 14px;"> // Initiate CameraView</span> <span style="font-size: 14px;"> cameraView = new CameraView(this);</span>
<span style="font-size: 14px;"> // Turn on Gestures</span> <span style="font-size: 14px;"> mGestureDetector = createGestureDetector(this);</span>
<span style="font-size: 14px;"> setContentView(cameraView);</span> <span style="font-size: 14px;">}</span> |
This way a simple camera preview has been implemented in our activity. In order to take a picture, a single tap must be performed using the glass gesture panel, which can be implemented by using a GestureDetector:
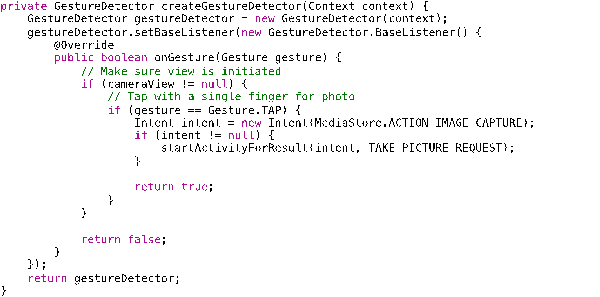
Then overriding the Generic Motion Event on the activity we just return the gesture detector, which will perform the picture taking action:

As noted by the previous code, in order to get a picture from the Glass Camera, an intent must be called, which returns the URI of the picture taken after a confirmation. Nevertheless, even if the URI is returned, this doesn’t mean that the photo is available (this is a known issue of the GDK). So a workaround is to implement a file watcher, which will tell us when the Picture has been written to the source folder:
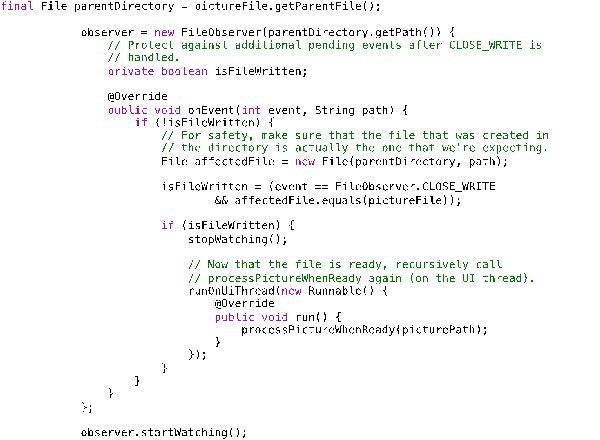
Just as a warning, sometimes the picture takes some time to be available (between 5 and 30 seconds) so don’t forget to implement a simple progress bar to tell the user that a process is being held.
After the picture has been written, we are now ready to send the picture file through Bluetooth. For this a new activity, it will show all the discovered Bluetooth devices using a scroll view, which can be navigated through the Glass Gesture Pad. To select a device a single tap will suffice.
The first task is implemented using a BroadcastReceiver, filtering by “BluetoothDevice.ACTION_FOUND” filter; which will constantly update our device list. Note that this method will only show the devices that are discoverable; so previous paired devices will not show up, even with Bluetooth on (this is a security measure). This task can be accomplished by the following code:
<span style="font-size: 14px;">Set<BluetoothDevice> pairedDevices = myBt.getBondedDevices();</span> <span style="font-size: 14px;"> if (pairedDevices != null && pairedDevices.size() > 0) {</span>
<span style="font-size: 14px;"> for (BluetoothDevice device : pairedDevices) {</span>
<span style="font-size: 14px;"> deviceName = (device.getName() != null) ? device.getName() : "Unnamed device";</span> <span style="font-size: 14px;"> bDevice = new BluetoothDeviceModel(deviceName, device.getAddress());</span> <span style="font-size: 14px;"> bluetoothDevicesAdapter.add(bDevice);</span> <span style="font-size: 14px;"> }</span> <span style="font-size: 14px;"> }</span> |
Where “myBt” is the device’s default Bluetooth adapter.
Instead of using a List View, the GDK introduces a navigation class called CardScrollView, which uses an adapter of “Cards”, where all the discovered devices can be shown. This View uses the same logic as a simple ListView, so we can ignore this step. The next step is to select a desired device to send the taken picture. Luckily for us, the CardScrollView class implements the same OnItemClickListener interface as a ListView:
<span style="font-size: 14px;">@Override</span> <span style="font-size: 14px;">public void onItemClick(AdapterView<?> parent, View, int position, long id) {</span>
<span style="font-size: 14px;"> overlayView.showWithMessageLoading();</span>
<span style="font-size: 14px;"> if (sendFileToDeviceTask != null) {</span>
<span style="font-size: 14px;"> Log.e(TAG, "Canceling old connection, and starting new one.");</span> <span style="font-size: 14px;"> sendFileToDeviceTask.cancel();</span> <span style="font-size: 14px;"> }</span>
<span style="font-size: 14px;"> BluetoothDeviceModel bDevice = (BluetoothDeviceModel)</span> <span style="font-size: 14px;"> bluetoothDevicesAdapter.getItem(position);</span> <span style="font-size: 14px;"> Log.i(TAG, "Connecting to device: " + bDevice.getDeviceMACAddress());</span>
<span style="font-size: 14px;"> if(selectedFile == null)</span> <span style="font-size: 14px;"> selectedFile = sendTestPicture();</span>
<span style="font-size: 14px;"> pref.edit().putString(SAVED_BT_DEVICE, bDevice.getDeviceMACAddress()).commit();</span>
<span style="font-size: 14px;"> callSendPictureService(bDevice.getDeviceMACAddress());</span> <span style="font-size: 14px;"> finish();</span> <span style="font-size: 14px;">}</span> |
And the implementation is pretty much straight forward:
<span style="font-size: 14px;">devicesScrollView = (CardScrollView) findViewById(R.id.pairing_devices_scroll_view);</span> <span style="font-size: 14px;">bluetoothDevicesAdapter = new BluetoothDevicesAdapter(this);</span> <span style="font-size: 14px;">devicesScrollView.setAdapter(bluetoothDevicesAdapter);</span> <span style="font-size: 14px;">devicesScrollView.setOnItemClickListener(this);</span> <span style="font-size: 14px;">devicesScrollView.activate();</span> |
After user tap, the Bluetooth client service is called, starting the communication with the server application. The function of this client is to keep a list of “ready to share” pictures, and send them one by one to the server device. Also, in case of a connection error, the service will try to resend the current photo. Given this, the algorithm for sending a picture through Bluetooth works as follows:
- Open socket communication with the Server application
- Send the number of bytes to send.
- Send the taken pictures as bytes.
- Close the connection
The following two lines of code do the first step:
<span style="font-size: 14px;">bluetoothSocket = device.createInsecureRfcommSocketToServiceRecord(</span> <span style="font-size: 14px;"> BluetoothParametersHolder.uuids[0]);</span> <span style="font-size: 14px;">bluetoothSocket.connect();</span> |
For the second step and the third step, we must send two kinds of information using the same Output Stream, this is, the picture size in bytes, and the actual picture as bytes. This is because the Server application must know how many bytes are expected to be received. Which is performed by the following function:
<span style="font-size: 14px;">private void sendFile(Uri, long size) throws IOException {</span>
<span style="font-size: 14px;"> BufferedInputStream bis = new</span> <span style="font-size: 14px;"> BufferedInputStream(context.getContentResolver().openInputStream(uri));</span> <span style="font-size: 14px;"> try {</span>
<span style="font-size: 14px;"> mmInStream = bluetoothSocket.getInputStream();</span> <span style="font-size: 14px;"> mmOutStream = bluetoothSocket.getOutputStream();</span>
<span style="font-size: 14px;"> int bufferSize = 1024;</span> <span style="font-size: 14px;"> ByteBuffer bb = ByteBuffer.allocate(bufferSize);</span> <span style="font-size: 14px;"> byte[] buffer = new byte[bufferSize];</span>
<span style="font-size: 14px;"> // we need to know how may bytes were read to write them to the byteBuffer</span> <span style="font-size: 14px;"> int len = 0;</span> <span style="font-size: 14px;"> //Send Header info</span> <span style="font-size: 14px;"> bb.asLongBuffer().put(size);</span> <span style="font-size: 14px;"> mmOutStream.write(bb.array(), 0, bufferSize);</span> <span style="font-size: 14px;"> while ((len = bis.read(buffer)) != -1) {</span>
<span style="font-size: 14px;"> mmOutStream.write(buffer, 0, len);</span> <span style="font-size: 14px;"> }</span> <span style="font-size: 14px;"> } finally {</span>
<span style="font-size: 14px;"> bis.close();</span> <span style="font-size: 14px;"> }</span> <span style="font-size: 14px;">}</span> |
Last but not least, to close the connection a single line is necessary:
<em>bluetoothSocket.close();</em>
This process will be repeated until the picture (or pictures) had been sent.
That’s it, we have successfully implemented a simple application that allows us to share pictures taken from a camera. But the application isn’t complete at this point, even if we manage to install the application on the Google glass device, the user will not have access to it. This is because the Google Glass interface doesn’t have an application explorer, given the limitation of user interaction. In order to allow the user to access our application, we can use the speech recognition system of the device. In order to do this, we just need to register the application to use such service in the application manifest file:
<span style="font-size: 14px;"><service</span> <span style="font-size: 14px;"> android:name=<strong>".services.GoogleVoiceTriggerService"</strong></span> <span style="font-size: 14px;"> android:label=<strong>"@string/app_name"</strong></span> <span style="font-size: 14px;"> android:icon=<strong>"@drawable/ic_launcher"</strong></span> <span style="font-size: 14px;"> android:enabled=<strong>"true"</strong> ></span> <span style="font-size: 14px;"><strong> </strong><intent-filter></span> <span style="font-size: 14px;"><strong> </strong><action android:name=<strong>"com.google.android.glass.action.VOICE_TRIGGER"</strong> /></span> <span style="font-size: 14px;"><strong> </strong></intent-filter></span> <span style="font-size: 14px;"><strong> </strong><meta-data</span> <span style="font-size: 14px;"> android:name=<strong>"com.google.android.glass.VoiceTrigger"</strong></span> <span style="font-size: 14px;"> android:resource=<strong>"@xml/activity_voice_trigger"</strong> /></span> <span style="font-size: 14px;"></service></span> |
Where activity_voice_triggeris just a XML variable that points to our application name string, in this case:
<em><trigger keyword=“@string/app_voice_trigger_name”/></em>
The service class if conformed by the following code:
<span style="font-size: 14px;">public class GoogleVoiceTriggerService <strong>extends</strong> Service <strong>{</strong></span>
<span style="font-size: 14px;"> private static final String LIVE_CARD_TAG <strong>=</strong> "itexico_picture"<strong>;</strong></span>
<span style="font-size: 14px;"> private TimelineManager mTimelineManager<strong>;</strong></span> <span style="font-size: 14px;"> private LiveCard mLiveCard<strong>;</strong></span>
<span style="font-size: 14px;"> @Override</span> <span style="font-size: 14px;"> public void onCreate<strong>()</strong> <strong>{</strong></span>
<span style="font-size: 14px;"> mTimelineManager <strong>=</strong> TimelineManager<strong>.</strong>from<strong>(</strong><strong>this</strong><strong>);</strong></span> <span style="font-size: 14px;"> <strong>super</strong><strong>.</strong>onCreate<strong>();</strong></span> <span style="font-size: 14px;"> <strong>}</strong></span>
<span style="font-size: 14px;"> @Override</span> <span style="font-size: 14px;"> public IBinder onBind<strong>(</strong>Intent intent<strong>)</strong> <strong>{</strong></span>
<span style="font-size: 14px;"> // TODO Auto-generated method</span> <span style="font-size: 14px;"> <strong>return</strong> <strong>null</strong><strong>;</strong></span> <span style="font-size: 14px;"> <strong>}</strong></span>
<span style="font-size: 14px;"> @Override</span> <span style="font-size: 14px;"> public int onStartCommand<strong>(</strong>Intent intent<strong>,</strong> int flags<strong>,</strong> int startId<strong>)</strong> <strong>{</strong></span>
<span style="font-size: 14px;"> mLiveCard <strong>=</strong> mTimelineManager<strong>.</strong>createLiveCard<strong>(</strong>LIVE_CARD_TAG<strong>);</strong></span> <span style="font-size: 14px;"> Intent i <strong>=</strong> <strong>new</strong> Intent<strong>(</strong><strong>this</strong><strong>,</strong> MainActivity<strong>.</strong>class<strong>);</strong></span> <span style="font-size: 14px;"> i<strong>.</strong>setFlags<strong>(</strong>Intent<strong>.</strong>FLAG_ACTIVITY_NEW_TASK<strong>);</strong></span> <span style="font-size: 14px;"> startActivity<strong>(</strong>i<strong>);</strong></span>
<span style="font-size: 14px;"> <strong>return</strong> START_STICKY<strong>;</strong></span> <span style="font-size: 14px;"> <strong>}</strong></span> <span style="font-size: 14px;"><strong>}</strong></span> |
Now the application will be shown at the “Ok, Google” menu, which can be accessed by voice or by scrolling.
At his point we have ready and implementation for the client application that will run on the Glasses device, let’s continue with the Server client for the Android device.
Server application
The server application is only in charge of initializing all the required services that will listen to all petitions of the Client (Google glass) application. After the client application starts to send the picture, a notification will appear at the Device notification bar, showing also the current progress of the transfer. When the transfer is finished, the service returns to "listening state" and the process can be repeated. In resume, the following parts are needed for our application:
- Main activity to start our service.
- Bluetooth connection listening service.
- Notification for transfer progress.
The first part is pretty much simple; we just need to create an empty activity in charge of starting the Bluetooth listener service. This can be accomplished by the following function:
<span style="font-size: 14px;">private void startBluetoothService() {</span>
<span style="font-size: 14px;"> Intent i= new Intent(context, BluetoothService.class);</span> <span style="font-size: 14px;"> context.startService(i);</span> <span style="font-size: 14px;">}</span> |
The second part is performed by two subroutines. The first one is a simple listener task that will listen to a preregistered socket connection (in this case a set UUID), which is performed by the following lines of code:
<span style="font-size: 14px;">mmServerSocket = bluetoothAdapter.listenUsingInsecureRfcommWithServiceRecord(</span> <span style="font-size: 14px;"> BluetoothParametersHolder.NAME, BluetoothParametersHolder.uuids[0]);</span> <span style="font-size: 14px;">while (true) {</span>
<span style="font-size: 14px;"> try {</span>
<span style="font-size: 14px;"> socket = mmServerSocket.accept();</span> <span style="font-size: 14px;"> if (socket != null)</span> <span style="font-size: 14px;"> mmServerSocket.close();</span> <span style="font-size: 14px;"> Thread.sleep(1000);</span> <span style="font-size: 14px;"> } catch (Exception e) {</span>
<span style="font-size: 14px;"> break;</span> <span style="font-size: 14px;"> }</span> <span style="font-size: 14px;">}</span> |
The first line registers the socket connection to hear whilst the second line loop is in charge of the continuous listening. The second subroutine is in charge of receiving the picture from the Glass device. For such task, first we must get the “header” which is the picture size in bytes, and after that, we must receive and save the actual picture’s bytes. To header for parsing is performed by the following code:
<span style="font-size: 14px;">private void parseHeader(byte[] bytes) {</span>
<span style="font-size: 14px;"> ByteBuffer bb = ByteBuffer.wrap(bytes);</span> <span style="font-size: 14px;"> totalBytesToReceieve = (int) bb.getLong();</span> <span style="font-size: 14px;"> Log.i(TAG, "Bytes to receive: " + totalBytesToReceieve);</span> <span style="font-size: 14px;">}</span> |
This way we can make the necessary calculation to show the progress notification at the device. Now, for the actual saving of a picture, the next code will be enough:
<span style="font-size: 14px;">private void savePicture() {</span>
<span style="font-size: 14px;"> File dcimDir = new File(Environment.getExternalStorageDirectory(), "DCIM");</span> <span style="font-size: 14px;"> String timeStamp = new SimpleDateFormat("yyyyMMdd_HHmmss",</span>
<span style="font-size: 14px;"> Locale.US).format(new Date());</span> <span style="font-size: 14px;"> int read;</span> <span style="font-size: 14px;"> boolean headerInfo = true;</span> <span style="font-size: 14px;"> byte[] bytes = new byte[bufferSize];</span> <span style="font-size: 14px;"> OutputStream = null;</span> <span style="font-size: 14px;"> try {</span>
<span style="font-size: 14px;"> outputStream = new FileOutputStream(new</span> <span style="font-size: 14px;"> File(dcimDir.getAbsolutePath(), "glass" + timeStamp + ".jpg"));</span> <span style="font-size: 14px;"> while ((read = inputStream.read(bytes)) != -1) {</span>
<span style="font-size: 14px;"> if (headerInfo) {</span>
<span style="font-size: 14px;"> parseHeader(bytes);</span> <span style="font-size: 14px;"> headerInfo = false;</span> <span style="font-size: 14px;"> } else {</span>
<span style="font-size: 14px;"> outputStream.write(bytes, 0, read);</span> <span style="font-size: 14px;"> this.onProgressUpdate(bytesProgress += read);</span> <span style="font-size: 14px;"> }</span> <span style="font-size: 14px;"> }</span> <span style="font-size: 14px;"> } catch (IOException e) {</span>
<span style="font-size: 14px;"> e.printStackTrace();</span> <span style="font-size: 14px;"> } finally {</span>
<span style="font-size: 14px;"> if (outputStream != null)</span> <span style="font-size: 14px;"> try {</span>
<span style="font-size: 14px;"> outputStream.close();</span> <span style="font-size: 14px;"> } catch (IOException e) {</span>
<span style="font-size: 14px;"> e.printStackTrace();</span> <span style="font-size: 14px;"> }</span> <span style="font-size: 14px;"> }</span> <span style="font-size: 14px;">}</span> |
Where the saving action is performed by the while loop, which will continue until no more bytes are available.
For the third and last part of our algorithm, we need to send a notification to the device. To perform this we use the onProgressUpdate method from the AsyncTask class. In there an interface is implemented which call the Service notification method. The method looks like this:
<span style="font-size: 14px;">private void sendProgressNotification(int progress, boolean isComplete) {</span>
<span style="font-size: 14px;"> if(notification == null) {</span>
<span style="font-size: 14px;"> Intent = new Intent(this, MainActivity.class);</span> <span style="font-size: 14px;"> PendingIntent pIntent = PendingIntent.getActivity(this, 0, intent, 0);</span> <span style="font-size: 14px;"> notification = new NotificationCompat.Builder(this);</span> <span style="font-size: 14px;"> notification.setContentTitle("Picture Download")</span>
<span style="font-size: 14px;"> .setContentText("Download in progress")</span>
<span style="font-size: 14px;"> .setSmallIcon(R.drawable.ic_launcher)</span> <span style="font-size: 14px;"> .setContentIntent(pIntent);</span> <span style="font-size: 14px;"> }</span> <span style="font-size: 14px;"> if(!isComplete) {</span>
<span style="font-size: 14px;"> notification.setProgress(100, progress, false);</span> <span style="font-size: 14px;"> } else {</span>
<span style="font-size: 14px;"> // When the loop is finished, updates the notification</span> <span style="font-size: 14px;"> notification.setContentText("Download complete")</span>
<span style="font-size: 14px;"> // Removes the progress bar</span> <span style="font-size: 14px;"> .setProgress(0,0,false);</span> <span style="font-size: 14px;"> }</span>
<span style="font-size: 14px;"> notificationManager.notify(0, notification.build());</span> <span style="font-size: 14px;">}</span> |
As depicted, the method receives the current progress and a Boolean, in case that the transfer has been completed.
Final remarks
After been working with the Google glasses for a week, approximately, I find out how new this technology is and how it’s open to improvements. The first thing I noted is how easily it gets unstable, mainly because the overheating arisen from use of the camera preview and Bluetooth. Also the debugging is somewhat cumbersome and neck unfriendly (more if you only have a short USB cable) and the non-existence of a good emulator doesn’t help also.
Nevertheless, this new hardware opens a new world of possibilities for application development. From integration between Google glasses and Android devices (basically Smartphones and smart watches), augmented reality to even collaboration with computers, TVs or other Google Glass devices. But with a poor SDK documentation, the absence of some common and simple android API access (such as the Share intent accessibility), and the lack of a good simulator (given the price of the Hardware), the arrival of interesting application could take some time.
About the Author
Victor Cervantes is an Android developer with 1+ years of experience with the Android mobile platform. He has a Master’s Degree in Computer Science specializing in optimization problem solving. He is an Appcelerator Titanium Certified Developer (TCD) specialized in Anroid development.


Post Your Comment Here