
iOS Mobile Development: Using Core Data to Build an iOS Mobile App
When building an iOS mobile application, one of the main issues of mobile developers is to know how to persist data on the mobile application so the user can save its changes. The need for a database is essential and Core Data is a great alternative for them. So what is Core Data?
An "easy" solution could be the call of Web Services to a remote database. But that would involve limiting the user to be online always and depending on a good connection. Here is where Core Data appears. Core data is a local database each iOS device has internally. Some of the main advantages that using Core Data can provide are:
· Reducing memory usage
· Increase the responsiveness of your app
· Making a cleaner arrangement of the data
Core data uses a sqlite database to store all the information. This may be helpful so you can export that database for other uses, but right now we'll focus on understanding how a Core Data Application works.
Creating a Basic Contact Directory
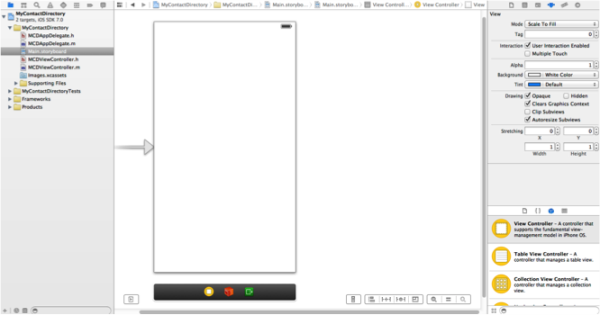
So let's get started. Open XCODE on your mac and create a new project with the Single View Application Template:
At the next screen, name your Product "MyContactDirectory", your custom company name and use MCD as the class prefix. Select iPhone as your device family. Click next and create the project.
Now that you're inside of your project the first thing we're going to do is set a basic interface so we can create our directory. Take a look at the sidebar that is at the left of your screen and click on the file that is named "Main. storyboard".
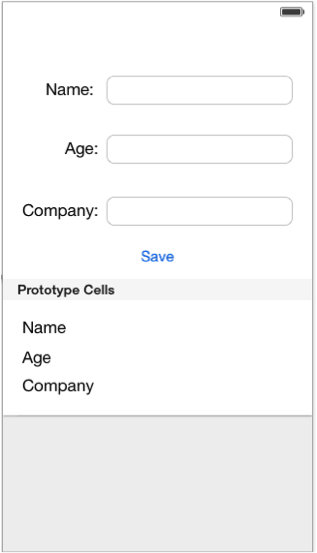
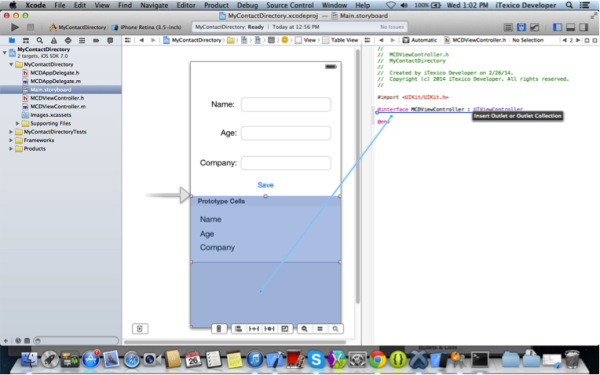
On this screen we're going to set our interface. First, we'll drag a table from the elements that are shown in the right-side bar at the bottom. Pick the element called "Table View" and drag it to the view controller located in the storyboard, try to resize it so it only fills half of the view. The second element that we will drag is the one named "Table View Cell", and it is located just below the Table View element. Drag the cell inside the table that we just created. Resize it to a height of 60 PX by dragging the edge down. From the right side bar, drag three Labels inside the table view cell and resize them so it fills inside. In the upper part of the view controller, drag another three labels and beside three text fields. Finally, add a button below and name it "Save". Arrange them in a way so that they look as the next image:
Now that we have drawn our interface, we need to connect some elements in order to have everything linked to our controllers. Our first step is to connect our table to our view controller. Press and hold your Ctrl key on you mac and click on the table view you just dragged to the view and hold and drag then click on the yellow icon at the bottom of the view. You'll see these options displayed in Figure 1.0 once you finished. Click on data source and repeat the process to click on delegate.
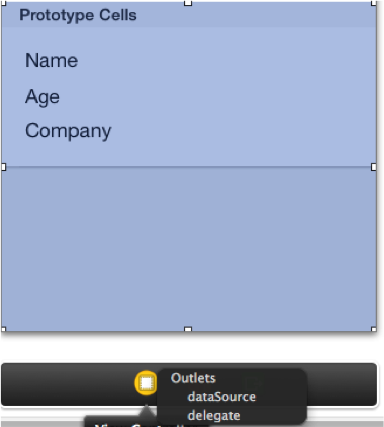
Figure 1.0
Click on the table view and go to the attribute inspector. Set the table view cell identifier as "personCell".
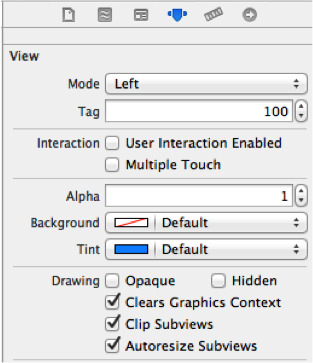
Our next step is to set an identifier for the labels inside the table view cell. Click on the first label and go to the attribute inspector (Shown in the right side of xcode, icon in Figure 1.1 should be selected). Scroll to the different options and search for the Tag textfield in the View section and change the value to 100, repeat the step with the remaining labels inside the cell using the values 101 and 102 in the Tag text field.
Our next step is to connect the elements to the MCDViewController.h file. Go to the top part of your application and select the assistant editor button (if you feel more comfortable hide the right side bar deselecting the button so the bar looks in this way.
Once you see these two screens select the MCDViewController.h file from the top bar shown in the right side.
You'll repeat the same process of holding ctrl key and dragging the views but this time inside the .h file. The first element we will connect is the table view. Hold Ctrl, click and drag the blue arrow to the.h file just between the @interface and @end tags.
A dialogue will display asking you the name of the element you're adding. Name your table, "tableView" and click ok. Repeat the same process with the textfields and the button. Name the first text field "nameTextField", the second one "ageTextField" and the third one "companyTextField". For the button use the name "saveButton". Call the delegates for UITableViewController in your interface.
Your MCDViewController.h should look like this right now:
#import <UIKit/UIKit.h> @interface MCDViewController: UIViewController <UITableViewDataSource, UITableViewDelegate> @property (weak, nonatomic) IBOutlet UITableView *tableView; @property (weak, nonatomic) IBOutlet UITextField *nameTextField; @property (weak, nonatomic) IBOutlet UITextField *ageTextField; @prop <br clear="all" />erty (weak, nonatomic) IBOutlet UITextField *companyTextField; @property (weak, nonatomic) IBOutlet UIButton *saveButton; @end |
Now that we have the basic user interface we can create our data model.
Go to your project window and click on Build Phases and next go to Link Binary with Libraries option. Click on the add button and add the CoreData.framework to the project.
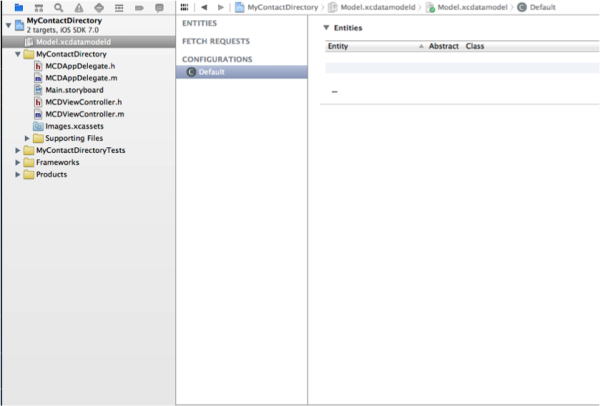
To start creating our model we need to create a new object model. To do this click file>new>File... (cmd+N) and select Core data/ Data Model and save it as a Model. Back on your project you'll see that a Model.xcdatamodeld was created. Click on it.
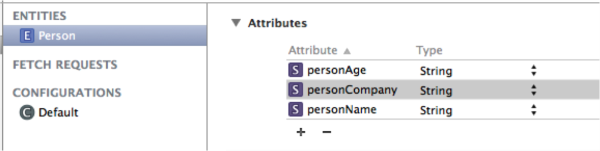
To start our model we will create a new Entity. For this click on the button that is located at the bottom of the window that is called "Add Entity". It will appear in the left panel of the Model Window. Click it and rename it to "Person". Next we need to add some attributes so our model can be created. We need to add a field for the person's name, age and company. For our purposes right now we will let all these attributes with the "string" type. Your screen will look like this:
Select your entity and click on file>new>file. (cmd + N) and select NSManagedObject subclass on the Core data section, click next. Our model should be selected, click next and the Person Entity should be selected as well. Finally, click finish. This should create you a .h and a .m file in your project with the name of your Entity. This class will be the model class of our application.
Now we have to declare our core data methods on the AppDelegate of the application. Add the following code to your MCDAppDelegate.h file:
#import <UIKit/UIKit.h> <b>#import <CoreData/CoreData.h></b> @interface MCDAppDelegate : UIResponder <UIApplicationDelegate> {
<b> NSManagedObjectModel *managedObjectModel;</b> <b> NSManagedObjectContext *managedObjectContext;</b> <b> NSPersistentStoreCoordinator *persistentStoreCoordinator;</b> } @property (strong, nonatomic) UIWindow *window; <b>@property (nonatomic, retain, read-only) NSManagedObjectModel *managedObjectModel;</b> <b>@property (nonatomic, retain, read-only) NSManagedObjectContext *managedObjectContext;</b> <b>@property (nonatomic, retain, read-only) NSPersistentStoreCoordinator *persistentStoreCoordinator;</b> <b>-(NSArray *) getUserData;</b> @end |
Let's analyze the elements we're adding to the file so we can understand what we're coding:
· NSManagedObjectModel: This object describes the collection of entities that you use in your application.
· NSManagedObjectContext: represents the object space and its responsibility is to manage a collection of managed objects.
· NSPersistentStoreCoordinator: associates persistent stores with a model and serve to mediate between the persistent store and the context.
· getUserData array: This is where the data in our model will be stored.
To start with some methods, go to your MCDAppDelegate.m file and add the following methods just before the @end tag:
- (NSManagedObjectContext *) managedObjectContext {
if (_managedObjectContext != nil) {
return _managedObjectContext; } NSPersistentStoreCoordinator *coordinator = [self persistentStoreCoordinator]; if (coordinator != nil) {
_managedObjectContext = [[NSManagedObjectContext alloc] init]; [_managedObjectContext setPersistentStoreCoordinator: coordinator]; } return _managedObjectContext; } - (NSManagedObjectModel *)managedObjectModel {
if (_managedObjectModel != nil) {
return _managedObjectModel; } _managedObjectModel = [NSManagedObjectModel mergedModelFromBundles:nil]; return _managedObjectModel; } - (NSPersistentStoreCoordinator *)persistentStoreCoordinator {
if (_persistentStoreCoordinator != nil) {
return _persistentStoreCoordinator; } NSURL *storeUrl = [NSURL fileURLWithPath: [[self applicationDocumentsDirectory] stringByAppendingPathComponent: @"Model.sqlite"]]; NSError *error = nil; _persistentStoreCoordinator = [[NSPersistentStoreCoordinator alloc] initWithManagedObjectModel:[self managedObjectModel]]; if(![_persistentStoreCoordinator addPersistentStoreWithType:NSSQLiteStoreType configuration:nil URL:storeUrl options:nil error:&error]) {
/*Error for store creation should be handled in here*/ } return _persistentStoreCoordinator; } - (NSString *)applicationDocumentsDirectory {
return [NSSearchPathForDirectoriesInDomains(NSDocumentDirectory, NSUserDomainMask, YES) lastObject]; } -(NSArray *)getUserData {
// initializing NSFetchRequest NSFetchRequest *fetchRequest = [[NSFetchRequest alloc] init]; //Setting Entity to be Queried NSEntityDescription *entity = [NSEntityDescription entityForName:@"Person" inManagedObjectContext:self.managedObjectContext]; [fetchRequest setEntity:entity]; NSError* error; // Query on managedObjectContext With Generated fetchRequest NSArray *fetchedRecords = [self.managedObjectContext executeFetchRequest:fetchRequest error:&error]; // Returning Fetched Records return fetchedRecords; } Also add this after the @implementation MCDAppDelgate line: @synthesize managedObjectContext = _managedObjectContext; @synthesize managedObjectModel = _managedObjectModel; @synthesize persistentStoreCoordinator = _persistentStoreCoordinator; |
This method will let us save the context of our model to the application in a sqlite database and to define the entities so we can save the objects in the application.
Moving forward to the actual data saving with core data lets us get to our MCDViewController.h file. Import the core data framework at the top (#import <CoreData/CoreData.h>) and import the Person class (#import "User.h"). Add the following code to your app.
#import <UIKit/UIKit.h> <b>#import "MCDAppDelegate.h"</b> <b>#import "Person.h"</b> <b>#import <CoreData/CoreData.h></b> @interface MCDViewController : UIViewController <UITableViewDataSource, UITableViewDelegate, <b>UITextFieldDelegate</b>> {
<b> MCDAppDelegate *appDelegate;</b> } @property (weak, nonatomic) IBOutlet UITableView *tableView; @property (weak, nonatomic) IBOutlet UITextField *nameTextField; @property (weak, nonatomic) IBOutlet UITextField *ageTextField; @property (weak, nonatomic) IBOutlet UITextField *companyTextField; @property (weak, nonatomic) IBOutlet UIButton *saveButton; <b>@property (nonatomic, retain) NSManagedObjectContext *managedObjectContext;</b> <b>@property (nonatomic,strong)NSArray* fetchedUsersArray;</b> @end |
All the data that will be generated by the core data model will be stored in the App Delegate, that's why we need to make an instance of this class. We also declare a managed object context and an array that will have the fetched results from the core data model.
Now on our MCDViewController we should declare the next methods. Follow the comments in the code to understand how each method is working:
#import "MCDViewController.h" #import "MCDAppDelegate.h" #import "Person.h" @interface MCDViewController () @property(strong)NSMutableArray *savedPersons; @end @implementation MCDViewController - (void)viewDidLoad {
[super viewDidLoad]; //Set to self the delegates so we can hide the keyboard later self.ageTextField.delegate = self; self.nameTextField.delegate = self; self.companyTextField.delegate = self; //Instance the App delegate to get all the shared methods appDelegate = [UIApplication sharedApplication].delegate; //Fetched array is equal to the person data stored on the array from the app delegate self.fetchedUsersArray = [appDelegate getUserData]; //Get the managed object context from the app delegate self.managedObjectContext = appDelegate.managedObjectContext; //set the method that will be launched when the user presses the save button [self.saveButton addTarget:self action:@selector(saveUserData) forControlEvents:UIControlEventTouchUpInside]; } -(void)viewWillAppear:(BOOL)animated {
[super viewWillAppear:YES]; NSManagedObjectContext *managedObjectContext = [self managedObjectContext]; //Fetch the entity data NSFetchRequest *fetchRequest = [[NSFetchRequest alloc] initWithEntityName:@"Person"]; //Retrieve data from the fetch request self.savedPersons = [[managedObjectContext executeFetchRequest:fetchRequest error:nil] mutableCopy]; //Reload tableview to check for new data [self.tableView reloadData]; } - (NSManagedObjectContext *)managedObjectContext {
NSManagedObjectContext *context = nil; id delegate = [[UIApplication sharedApplication] delegate]; if ([delegate performSelector:@selector(managedObjectContext)]) {
context = [delegate managedObjectContext]; } return context; } - (NSInteger)numberOfSectionsInTableView:(UITableView *)tableView {
// Return the number of sections. return 1; } - (NSInteger)tableView:(UITableView *)tableView numberOfRowsInSection:(NSInteger)section {
if ([self.savedPersons count]==0) {
//If there are no persons registered in the database don't show any cell return 0; } //else, show the number of persons registered in the database return [self.savedPersons count]; } -(UITableViewCell *)tableView:(UITableView *)tableView cellForRowAtIndexPath:(NSIndexPath *)indexPath {
static NSString *CellIdentifier; UITableViewCell *cell; if ([self.savedPersons count]) {
//There are users registered in the coredata model CellIdentifier = @"personCell"; } cell = [tableView dequeueReusableCellWithIdentifier:CellIdentifier forIndexPath:indexPath]; if (cell == nil) {
cell = [[UITableViewCell alloc] initWithStyle:UITableViewCellStyleSubtitle reuseIdentifier:CellIdentifier]; } //Identify the labels in the cell UILabel *nameLabel = (UILabel *)[cell viewWithTag:100]; UILabel *ageLabel = (UILabel *)[cell viewWithTag:101]; UILabel *companyLabel = (UILabel *)[cell viewWithTag:102]; //Get the persons stored in the array we created with the data retrieved from the core data model Person *personModel = [self.savedPersons objectAtIndex:indexPath.row]; //Set the attributes of the person at the current index in the labels [nameLabel setText:personModel.personName]; [ageLabel setText:personModel.personAge]; [companyLabel setText:personModel.personCompany]; return cell; } -(void)saveUserData {
//Set the context NSManagedObjectContext *context = [self managedObjectContext]; //Get the model for our entity Person *newPersonData = [NSEntityDescription insertNewObjectForEntityForName:@"Person" inManagedObjectContext:context]; //set the new person with its attributes newPersonData.personName = self.nameTextField.text; newPersonData.personAge = self.ageTextField.text; newPersonData.personCompany = self.companyTextField.text; NSError *error = nil; //Save the object to the persisten store if (![context save:&error]) {
NSLog(@"Can't Save! %@ %@", error, [error localizedDescription]); } NSManagedObjectContext *managedObjectContext = [self managedObjectContext]; NSFetchRequest *fetchRequest = [[NSFetchRequest alloc]initWithEntityName:@"Person"]; //Refresh the database to save the new entry self.savedPersons = [[managedObjectContext executeFetchRequest:fetchRequest error:nil]mutableCopy]; //Refresh the tableview to check for new objects [self.tableView reloadData]; //Hide keyboard [self.view endEditing:YES]; } -(BOOL)textFieldShouldReturn:(UITextField *)textField {
//If the return key is pressed hide the keyboard [textField resignFirstResponder]; return YES; } - (void)didReceiveMemoryWarning {
[super didReceiveMemoryWarning]; } @end |
Now that we have finished with the code we can run our application in the simulator. Let's Run it in the simulator or in our device. You should see an initial screen with no table rows (left image). We can add new info and when we press save our new person will be displayed on the table below (right image).

We can keep adding new record to our database and they will be kept on a sqlite database.
Working with core data can save you a lot of time and CPU usage. One good example where this can be used is when using web services. Instead of calling every time for information you can store those values in a data model and when there's new information you can refresh it.
About the Author
Ernesto Kuri is a Technology and Communication Engineer. He has been working on iOS mobile app development for 2+ years.


Post Your Comment Here