Web Development: Using RVM to Manage Multiple Environments of Ruby
Once we decide to learn a new programming language, framework, etc., one of the principal questions is: how can I install it? After a few days, we realize that there are many different versions. Normally, we always want to install the latest version in order to learn the most recently approaches. However, we'll sometimes have to set up different versions for many different reasons such as compatibility with others components, libraries, API's, etc. Our first question changes from “How can I install it?” to “How can I set up many different versions?” In this mini tutorial, I'm going to show you how we can set up different versions of ruby using RVM for web development, so let's get started.

What is RVM?
According to its website, RVM is a command-line tool which allows you to easily install, manage and work with multiple ruby environments from interpreters to sets of gems. It’s basically that!
Installing RVM
There are three ways to install and configure RVM:
1- Single-user
2 -Multi-User
3- Mixed Mode
In this mini-tutorial, we'll only cover the Single-user installation. If you want to learn more of how to install RVM using other ways, you can look at the documentation in the link here.
1.- First, you need to have GIT and curl installed, then download and run the RVM installation script, in a terminal, type this command: user$ curl -L https://get.rvm.io | bash -s stable
Here, we're using curl to download the script and runs the script in a bash shell (we're installing the stable release version of rvm).
2.- RVM needs to be load into our shell session as a function. In Single-user installations, RVM function is automatically configured for every user on the system. So in this step, we don't do nothing.
3.- Close out your current terminal or run the following command in order to reload the session:
user$ source ~/.rvm/scripts/rvm
itexico@itexico-virtualbox:~$ source ~/.rvm/scripts/rvm |
4.- Finally, we can test the installation whit the following command: user$ type rvm | head -n 1
itexico@itexico-virtualbox:~$ source ~/.rvm/scripts/rvm |
If all is right, we should see the output "rvm is a function"
Using RVM to set up different environments of Ruby
Some basic commands:
user$ rvm list => List all version of rubies installed user$ rvm use version_ruby => To use a specific version of ruby user$ rvm gemset list all => List all gem sets user$ rvm gemset create gemset_name => To create a gemset user$ rvm gemset use gemset_name => To use an specific gemset |
Ok, let's run the following command: user$ rvm list
We'll get something like this:

That means we don't have any version of ruby installed yet.
1.- Install a new version of ruby:
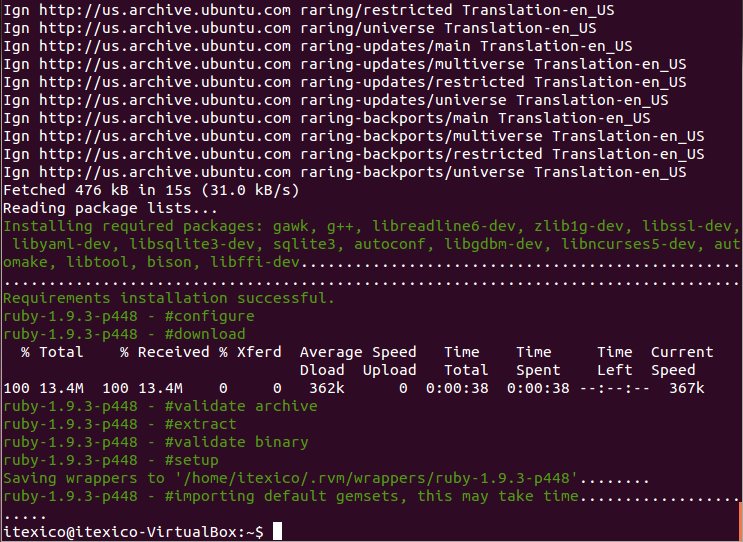
To install a new version of ruby, we only need to run this command: user$ rvm install 1.9.3
itexico@itexico-virtualbox:~$ rvm install 1.9.3 |

With this command, we're telling RVM to install ruby version 1.9.3 easy, isn’t it? (The same process to install any different version of ruby)
If we want be sure that the version 1.9.3 of ruby was installed, we can run the RVM command to list all versions of ruby installed: user$ rvm list

We should see our new version installed
2.- Use an specific version of ruby:
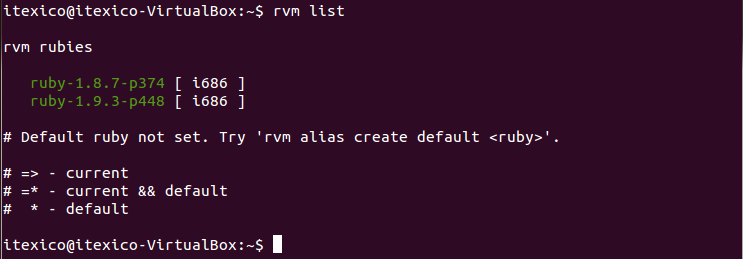
In order to show you how is possible to switch between different versions of ruby, I have installed another version of ruby (1.8.7). It was installed just like we did in the before step (with the version 1.9.3). This means that now I have two versions of ruby installed and when I run the command: user$ rvm list
We see something like this:

Now if we run the ruby -v command to see what version of ruby we're using, we will get an error like this:

Why is this error? This is because we have not told RVM which version we will use, so, to use a specific version we only need to run this command: user$ rvm use 1.9.3
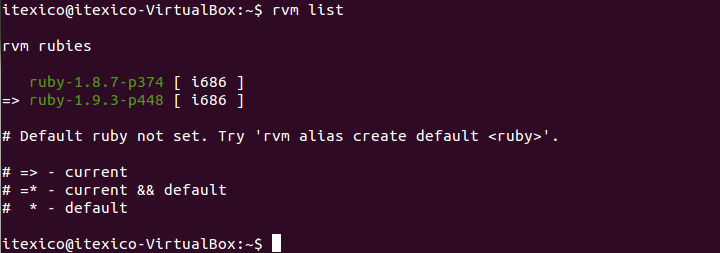
With this command, we're telling RVM to use the version 1.9.3 of ruby. Now if we run the command to list the versions of ruby installed (rvm list), we should see something like this:


Notice that now the version that we're using has a mark ( => ), as you can see in the image, this mark means "current" and there are another marks =*(current and default) and * (default), you can look at the documentation at RVM site to see how you can tell RVM to set a default version.
As we can see, change between versions of ruby is very easy to do, for example If you want to use the version 1.8.7 of ruby you only need to run the command "rvm use" passing the version to use as param.
3.- Gemsets
We had learned: how we can install many different version of ruby (and use it)! If we want to manage many different versions of gems, RVM gave us a powerful tool called Gemset. A gemset is a set of gems that we can use almost exclusively. So, we can have several gemset and use it in wherever project we want.
3.1- Create a gemset.
To create a gemset, we need to select a version of ruby we want to use (if we did not before) and run the following command: user$ rvm gemset create my_first_gemset

With this command, we're telling RVM to create a gemset with the name my_first_gemset
3.2- See the gemsets
To see the gemsets installed. we only need to run this command: user$ rvm gemset list

3.3 Use a specific gemset
To use a specific gemset, we only need to run this command: user$ rvm gemset use my_first_gemset

Now that we're using a gemset, all gems that we install will be part of this gemset. Therefore, we can install a gem with different versions in different gememsets.
itexico@itexico-virtualbox:~$ gem install rspec |
Final Thoughts
RVM is an amazing tool to manage our ruby environments! It's an easy way to switch between different versions of ruby and gemsets becomes it a powerful tool.
About the Author
Omar Reyes is a Software Developer with more than 4 years of experience in web development using Ruby, Java and Javascript. He currently works at iTexico as a Software Developer.


Post Your Comment Here