
Mobile Development Tips: Distributing Beta Apps Through TestFlight
Software Development Common Issue - 110: 30 Testers need a new mobile app build every week on their personal mobile devices to test the software application before it goes to market. The app is not just for one iPhone but for 30 iPhones, iPads, and perhaps even an iPod too!
Mobile developers often encounter this task of delivering a beta app to their customers. The customer wants to test it on his or her own device. Sometimes this can be a fast and easy job, just add the device to the provisioning profile, build your project and send the .ipa file to your customer. However, what if your client wants to send to a group of testers?
Well, there's a very handy tool called TestFlight! This is here to help us save lots of time doing this!
This post is intended to show how to distribute your iOS beta app through TestFlight with only a few steps. Lets go ahead and begin..
Getting Started
1. Register
First, you must do is head online to TestFlight and create an account (don’t worry, creating your account is free and it only takes a minute).
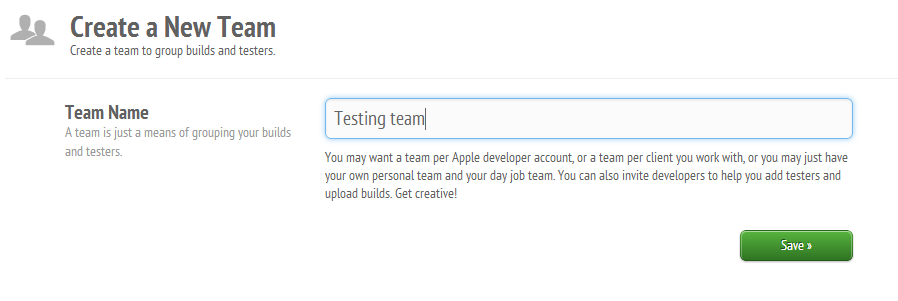
2. Create a New Team
As soon as you create your account, you we’ll be logged in. Now, select the “Add team” option and create a new team.
3. Invite people to your team
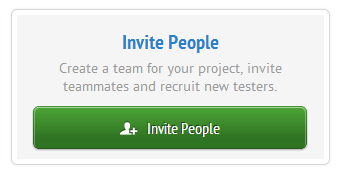
Now go to the Dashboard and choose the “Invite People” option.
This will take you to a form where you just need to provide the email of your team members. Type the email and a short message and just click “Send invitation”. Repeat this step to add as many team members, as you need.
4. Wait for team members to accept and update provisioning profile
Now, you will have to wait for everyone to accept your invitation. You will be notified when your team members have accepted the invitation by a green status indicator next to their name.
While you are waiting for them to accept, you may want to ask the UDID (Unique Device Identifier) of each device where the app is going to be tested. In you don't know how to get their unique device number, here’s a short article of how to obtain the UDID of your device.
Now that you have all the UDID strings you need, you have to add the devices to your Apple developer account and create a new provisioning profile for your app. I’m assuming you know how to do this, but in case you need it, you can check the official Apple’s documentation about “Provisioning Your Devices for Development” here.
At this point, you are ready to create your app build.
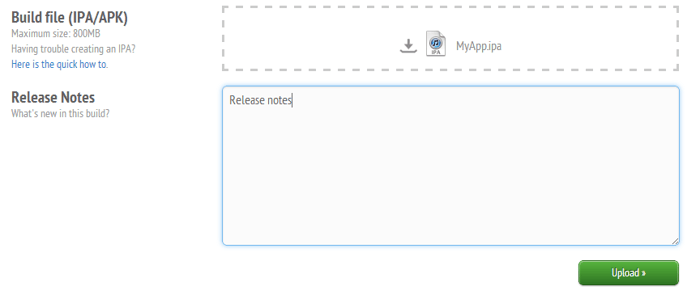
5. Upload the ".ipa" file
Go to the TestFlight Dashboard and choose the “Upload a Build” option. You just have to drag and drop your .ipa file (the app's executable file) to the upload form and choose the “Upload” option.
That’s all! All your team members will be notified that a build has been uploaded. They we’ll be able to install it on their devices.
Feel free to upload a build every time that you consider it necessary. Remember that everytime you do it your team members will be notified.
Final thoughts
TestFlight is a pretty powerful tool! It can do a lot of stuff besides beta distribution and managing your testing teams. Feel free to explore all its features and enhance your mobile development process!
About the author
Emiliano Lopez is a Multimedia Production Engineer with more than two years of experience in Software development. He is currently working at iTexico as Software Engineer developing and testing mobile apps.


Post Your Comment Here