
Web Automated Testing w/ Selenium WebDriver, TestNG & Eclipse - Part 1

Web Apps Testing
Nowadays, our Web Apps need to be constantly evolving to adapt to the actual needs of the users. So, we have to keep adding new features and adjusting some functionality. In that processes of change, we have to be very cautious to be sure we're not messing up other features. Therefore, we do regression tests every time that our apps are exposed to modifications, but it will come a time when our app will have so many features that performing the tests will be an extremely slow and boring process.
That's when automated tests come to the rescue!
Automated tests will allow us to be sure that our web apps are still working the way we want to, in a relatively short amount of time.
In this series of tutorials, we'll see how to create automated tests to our web apps using Selenium WebdDriver and TestNG framework.
Prerequisites
1.- Apache Maven
2.- Eclipse IDE
3.- TestNG for Eclipse (TestNG plug-in for Eclipse, you can get it for free at Ecplise Marketplace)
4.- Mozilla Firefox browser (Currently Firefox is supported until version 17, so maybe you'll need to downgrade your browser to achieve this tutorial goals).
Creating the project and setting up the dependencies
First, we will create a maven project called "AutomatedTest" that will be in the package "com.itexico.automatedtest". Go to the Command Promt and type the following command at your workspace folder:
<span class="pln">mvn archetype</span><span class="pun">:</span><span class="pln">generate </span><span class="pun">-</span><span class="typ">DgroupId</span><span class="pun">=</span><span class="pln">com</span><span class="pun">.</span><span class="pln">itexico</span><span class="pun">.</span><span class="pln">automatedtest </span><span class="pun">-</span><span class="typ">DartifactId</span><span class="pun">=</span><span class="typ">AutomatedTest</span> <span class="pun">-</span><span class="typ">DarchetypeArtifactId</span><span class="pun">=</span><span class="pln">maven</span><span class="pun">-</span><span class="pln">archetype</span><span class="pun">-</span><span class="pln">quickstart </span><span class="pun">-</span><span class="typ">DinteractiveMode</span><span class="pun">=</span><span class="kwd">false</span> |
A new folder called "AutomatedTest" has been created, go into that folder and open the "pom.xml" file in your favorite text editor, delete the actual dependencies and add the following:
<dependencies><br class="kix-line-break" /> <dependency><br class="kix-line-break" /> <groupId>org.seleniumhq.selenium</groupId><br class="kix-line-break" /> <artifactId>selenium-java</artifactId><br class="kix-line-break" /> <version>2.28.0</version><br class="kix-line-break" /> </dependency><br class="kix-line-break" /> <dependency><br class="kix-line-break" /> <groupId>com.opera</groupId><br class="kix-line-break" /> <artifactId>operadriver</artifactId><br class="kix-line-break" /> </dependency><br class="kix-line-break" /> <dependency><br class="kix-line-break" /> <groupId>org.testng</groupId><br class="kix-line-break" /> <artifactId>testng</artifactId><br class="kix-line-break" /> <version>6.8</version><br class="kix-line-break" /> </dependency><br class="kix-line-break" /></dependencies><br class="kix-line-break" /><dependencyManagement><br class="kix-line-break" /> <dependencies><br class="kix-line-break" /> <dependency><br class="kix-line-break" /> <groupId>com.opera</groupId><br class="kix-line-break" /> <artifactId>operadriver</artifactId><br class="kix-line-break" /> <version>1.1</version><br class="kix-line-break" /> <exclusions><br class="kix-line-break" /> <exclusion><br class="kix-line-break" /> <groupId>org.seleniumhq.selenium</groupId><br class="kix-line-break" /> <artifactId>selenium-remote-driver</artifactId><br class="kix-line-break" /> </exclusion><br class="kix-line-break" /> </exclusions><br class="kix-line-break" /> </dependency><br class="kix-line-break" /> </dependencies><br class="kix-line-break" /></dependencyManagement> |
After that, return to the Command Prompt and go to the recently created folder and type the following command to install the dependencies:
<span class="pln">mvn clean install</span> |
Now we just need to adapt our new project to the eclipse format, so we execute the following command:
<span class="pln">mvn eclipse</span><span class="pun">:</span><span class="pln">eclipse</span> |
Importing the file to Eclipse
Our project is ready to be imported on Eclipse, just follow the next steps to import it:
1.- Right click the package explorer and click import
2.- Then select existing project into workspace
3.- Click browse and select your workspace
4.- Select the project and click Finish
Prepare Test class
Now that our project is imported we'll prepare our first Test class
Go to the folder src/test/java at package explorer, select the package com.itexico.automatedtest, create a new class and name it "AutomatedTest".
Then add the following imports:
import org.testng.annotations.Test;<br class="kix-line-break" />import org.testng.annotations.BeforeMethod;<br class="kix-line-break" />import org.testng.annotations.BeforeClass;<br class="kix-line-break" />import org.testng.annotations.AfterMethod;<br class="kix-line-break" />import org.testng.annotations.AfterClass;<br class="kix-line-break" />import static org.testng.Assert.*;<br class="kix-line-break" /><br class="kix-line-break" />import org.openqa.selenium.WebDriver;<br class="kix-line-break" />import org.openqa.selenium.firefox.FirefoxDriver; |
Then have to declare our WebDriver, this will communicate with the browser to execute the tests.
<span class="kwd">private</span> <span class="typ">WebDriver</span><span class="pln"> driver</span><span class="pun">;</span> <span class="com">//Driver that will execute the tests</span> |
We have to create 4 basic methods that will lead our test, and put their proper annotations to indicate TestNG when each method is supposed to be executed. So add the following code to your class:
//Will only run once; before any test is executed<br class="kix-line-break" />@BeforeClass<br class="kix-line-break" />public void beforeClass() {<br class="kix-line-break" /> <br class="kix-line-break" />}<br class="kix-line-break" /> <br class="kix-line-break" />//Will only run once; after every test have been executed<br class="kix-line-break" />@AfterClass<br class="kix-line-break" />public void afterClass() {<br class="kix-line-break" /> <br class="kix-line-break" />}<br class="kix-line-break" /> <br class="kix-line-break" />//Will run before every test<br class="kix-line-break" />@BeforeMethod<br class="kix-line-break" />public void setUp() {<br class="kix-line-break" /> <br class="kix-line-break" />}<br class="kix-line-break" /> <br class="kix-line-break" />//Will run after every test<br class="kix-line-break" />@AfterMethod<br class="kix-line-break" />public void tearDown() {<br class="kix-line-break" /> <br class="kix-line-break" />}
|
For this tutorial, we'll need the WebDriver to be initialized for every test, closed after every test and, to be sure that every window is closed at the end, we'll quit the driver after all tests have been executed.
So modify the afterClass, setUp and teardown methods as follows:
//Will only run once, after every test have been executed<br class="kix-line-break" />@AfterClass<br class="kix-line-break" />public void afterClass() {<br class="kix-line-break" /> driver.quit(); //Quits this driver, closing every associated window.<br class="kix-line-break" />}<br class="kix-line-break" /><br class="kix-line-break" />//Will run before every test<br class="kix-line-break" />@BeforeMethod<br class="kix-line-break" />public void setUp() {<br class="kix-line-break" /> driver = new FirefoxDriver(); //An instance of the driver that will drive a Firefox browser.<br class="kix-line-break" />}<br class="kix-line-break" /> <br class="kix-line-break" />//Will run after every test<br class="kix-line-break" />@AfterMethod<br class="kix-line-break" />public void tearDown() {<br class="kix-line-break" /> driver.close(); //Close the current window..<br class="kix-line-break" />}
|
Now, we'll create our first test method using the @Test annotation to indicate TestNG this is a test:
//First test<br class="kix-line-break" />@Test<br class="kix-line-break" />public void firstTest() {<br class="kix-line-break" /> <br class="kix-line-break" />}
|
For this tutorial, we'll make a very simple Test, we'll open Google site and assert that the title is Google. To achieve that, we need to call the get method of the WebDriver and send it Google's url, then call the assertTrue method and send it a Boolean expression to make sure the title is "Google", to get the title we'll use the getTitle method of the WebDriver. Our code will look like this:
//First test @Test public void firstTest() {
driver.get("http://www.google.com/"); //Tell the driver to go to this URL
assertTrue(driver.getTitle().equals("Google")); //Make sure that the title of the page is "Google"
} |
Now, we'll run our test (be sure you've previously installed the TestNG for Eclipse plugin). Just right-click our code and select: Run As > TestNG Test.
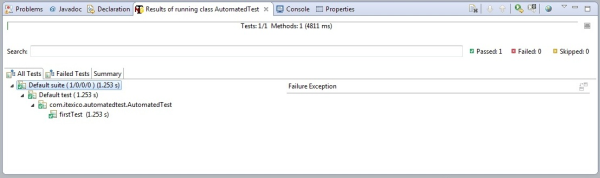
A Firefox window should open and go to Google site. To see our test results there are two options; we can see them at the "Results" tab that TestNG for Eclipse generate.
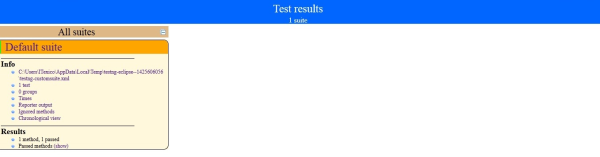
Or we can see an automatic report created by TestNG. To see the report just go to your project folder, then go to the "test-output" folder and open the "index.html" file.
So, that's it for now! We've set up our project and executed our first automated test. In the next tutorials of this series we'll make our code more legible using the "Page Object Model" and also we'll explore the capabilities of the WebDriver and the TestNG framework to do more functional testing and creating custom reports.
So stay tuned, or subscribe to our mailing list!
About the autor
Emiliano Lopez is a Multimedia Production Engineer with more than two years of experience in Java development. He is currently working at iTexico as Software Engineer specialized in automated testing design.

Post Your Comment Here