
Android Modules for Titanium Mobile Apps - Working with Proxy (Part 1)
In the previous post about creating an Android Module to extend the functionality of Titanium, maybe you know that modules can be quite handy, especially if you already have written some java code or if you need to use a 3rd party library inside your titanium app.
.png)
The Module!
Before we start talking about the proxy, lets just recall a little bit about the Module Project. Once you have created a module project, Titanium creates the basic structure of the project along with some sample code for the module and the proxy (you can find this code in src/Project.Package.Name/ ).

This time we will not focus on what you can do using the file of the Module (since you probably already know).
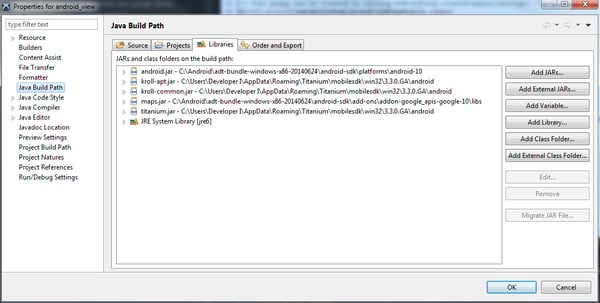
One important thing to know when you are working with modules is the fact that all code written in java still needs to comply with the API level that you are using inside the module, that is, if you are using some functionality that was added on API level 19, you will need to change the android.jar file being used by the module.
This can be easily done inside the properties of the project. Just right click on the project, and select Properties-> Java Build Path -> Libraries. There you will find the path to the android.jar file being used which by default is pointing to Android API level 10.
Then, open the build.properties file and change the android.platform and google.apis values to the correct path and save the changes.
Once you have everything to setup your module, you can proceed to build the module. This is done by right clicking on the build.xml file and select Run As -> Ant Build. Then just wait for the build to be completed and locate your module inside the dist directory (a zip file).
Importing the module
In the previous post about Android Modules, the instructions were provided as if you were using OSX. I am currently using Windows, so, I’ll give a quick explanation of how to import your module to your Mobile App Project.
Just go to the help menu in Titanium Studio, and go to Install Mobile Module. A small window will appear where you can browse for your module’s zip file. Once you have selected the zip file select your output location. I prefer to use “Mobile App Project” to install the module only in the project where it will be needed.
Once you have installed your mobile module in the mobile app, go to the tiapp.xml file, and you will see the module added to your application.
One important thing that you need to check in this step, is that the Titanium SDK being used by your Mobile Application and your Mobile Module. Sometimes when you add an android module which is built using a different SDK version than the Mobile application it will not be added to the mobile project (even if Titanium Studio tells you that it was added successfully).
If you run into this issue just change the SDK version used by your Mobile App to be the same as your Mobile Module and try again. If you cannot change the SDK version being used by the Mobile App, you will need to change the one being used by the module.
To accomplish this, go to your Mobile Module Project and open the build.properties file and proceed to change the titanium.platform value so it points to the Titanium SDK version that you need to use.
Then open the project properties, and go to Java Build Path -> Libraries. Here you will need to change the kroll-apt.jar, kroll-common.jar and titanium.jar. You need to change this files and select the ones inside the Titanium SDK that you want your module to be built with.
Once you have completed this changes, re-build the module as explained before and try to add it to your Mobile App Project again.
The Proxy
If you open the ExampleProxy.java file created by Titanium, you will notice that it tlready has some methods and a property getter and setter (at the end of the file). This works the same way as in a module, so, we will not focus on them this time. The parts that we will focus on are the ExampleProxy class which extends TiViewProxy and ExampleView which extends TiUIView.
First lets start with ExampleView, which as its name suggests represents a View. Inside its constructor you will see a few lines of code that define the basic layout behaviour of this view (using a LayoutArrangement object). You can modify this section of code to make your view look and behave the way you expect. Then, once everything is correct you can use it as a native view using a TiCompositeLayout object:
setNativeView(new TiCompositeLayout(proxy.getActivity(), arrangement)); |
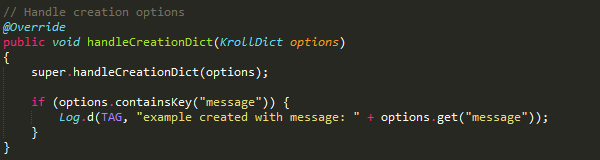
The other important class is the proxy itself. This class has two very important methods: createView and handleCreationDict. Inside the createView method the proxy defines the view that will be passed to the Mobile App Project, in this case, using the ExampleView class.
The handleCreationDict method, as its name suggests, provides means to handle parameters passed on by the Titanium Mobile Application to the Titanium Mobile Module using a KrollDict object as a container to this parameters.
Finally, you can take a look at the sample code provided inside the Mobile Module Project, go to example/app.js. This file gives you an example of how to use the module and its proxy. I will not go into details about how to use the module itself, this time we will only take a look at the way we add the proxy to the application.
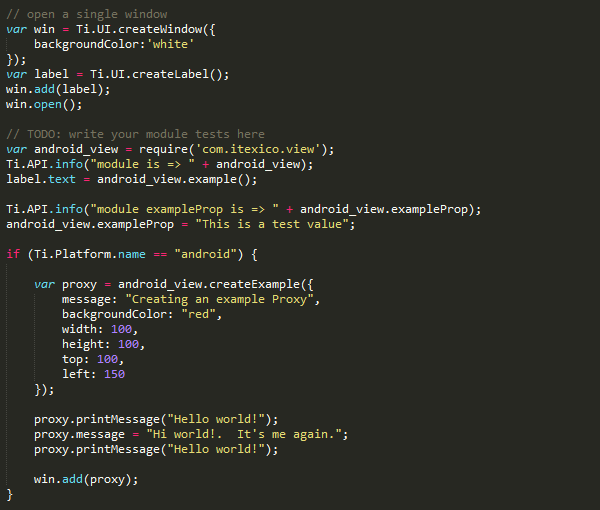
Notice that, before creating the proxy, you will have to create the module using:
var android_view = require('com.itexico.view');
|
Once you have created the module, you can create the proxy:
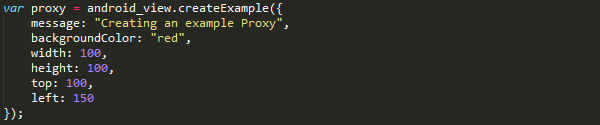
Here, the proxy is created using module_name.createExample(). You will notice that you have no method called createExample inside your module. This is handled by Titanium automatically using the name of your Proxy Class, in this case it is called ExampleProxy, so, the method is called createExample (not createExampleProxy).
You can also see a set of parameters that are being passed to this method, this parameters are received by the handleCreationDict method.
At the end of the sample code provided inside the Mobile Module Application, you can see that the created proxy is being added to the window of the application using:
win.add(proxy); |
It’s important to mention that when you call the createExample method, Titanium only calls Proxy’s constructor, it does not create its view. The view is created when you call the add method, if you add some methods to the ExampleView object, you will have to wait until it is created to be able to use them.
These are only some basic things to consider when you are developing a proxy to be used with your Mobile Module Project. Try it for yourself and let me know what you think!
About the author
Eduardo Martinez is an Android Developer with a Masters in Computer Science specialized in ubiquitous and mobile computing, he has over 2 years of experience on Android.


Post Your Comment Here