
Tutorial: Titanium Using PHP and Alloy to Connect a Remote Database

Hello there! As you may or may not know, Appcelerator’s Titanium, a cross-platform mobile development tool, has a shiny new framework called Alloy. Alloy works with an MVC pattern (Models, Views and Controllers) and allows you to effectively manage your code, assets and resources within a project. Since Alloy is fairly new, developers are still getting around how to perform some simple tasks using this great new tool.
This tutorial will guide you throughout a series of steps on how to insert and retrieve information from a remote database using simple PHP web services to handle the connection, retrieve the data from the database using JSON format, and show that data in a simple TODO list application using the alloy framework and a HTTP client.
These steps were made using a Windows environment.
Assumptions
- You have installed WAMP/LAMP/MAMP Server in your computer, you can use a different package for Apache, MySQL & PHP if you so desire - WAMP is only personal preference.
- If you haven’t installed WAMP/LAMP/MAMP yet then you can follow any of these tutorials
WAMP - Tutorialchip
LAMP - Unixmen
MAMP - Aschroder - You have installed the latest version of Titanium and Titanium Studio and you have a basic knowledge of how to use Titanium/Alloy framework.
- Since we are using WAMP Server this application can only be tested using the emulator/simulator, if you want to test it on your device then you’ll need a host.
- A little knowledge about PHP (not necessary).
Creating the database
Once it is installed we can start creating the database, head up to http://127.0.0.1/phpmyadmin/ OR http://localhost/phpmyadmin/ go to the databases tab and create a new database called, “todolist”.
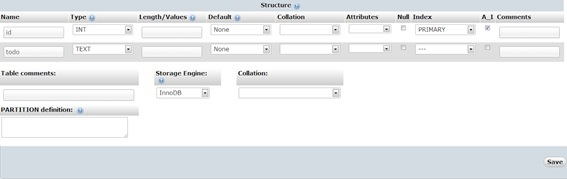
Head up to the structure of the database and create a table called “mylist” with a column named id (int, primary key and auto_increment) and another row named “todo” this one will be TEXT.
- You can insert a value to test your database
Working with Alloy
Once this is done let’s head up to Titanium Studio and create a new Default Alloy Project, you can name it as you wish.
Go to the project explorer and open the “index.xml” and replace the code that is already with the code below:
<span style="font-size: 13px;"><Alloy> </span> <span style="font-size: 13px;"> <TabGroup id="mainTabGroup"> </span> <span style="font-size: 13px;"><!-- On click event execute getTodoList --></span> <span style="font-size: 13px;"> <Tab id="tab1" onClick="getTodoList"> </span> <span style="font-size: 13px;"> <Window id="readWin"> </span> <span style="font-size: 13px;"> <TableView id="tableView"/> </span> <span style="font-size: 13px;"> </Window> </span> <span style="font-size: 13px;"> </Tab> </span> <span style="font-size: 13px;"> <Tab id="tab2"> </span> <span style="font-size: 13px;"> <Window id="insertWin"> </span> <span style="font-size: 13px;"> <View id="mainView"> </span> <span style="font-size: 13px;"> <TextField id="inserTxtF"/> </span> <span style="font-size: 13px;"> <Button id="insertBtn" onClick="insertData" /> </span> <span style="font-size: 13px;"> </View> </span> <span style="font-size: 13px;"> </Window> </span> <span style="font-size: 13px;"> </Tab> </span> <span style="font-size: 13px;"> </TabGroup> </span> <span style="font-size: 13px;"></Alloy></span> |
This code is self-explanatory we are creating two tabs and two windows, one with a table view for retrieving data and another one for inserting the data.
<span style="font-size: 13px;">"TabGroup":{ </span>
<span style="font-size: 13px;"> backgroundColor:"black", </span> <span style="font-size: 13px;">}, </span> <span style="font-size: 13px;">"View":{ </span>
<span style="font-size: 13px;"> layout:'vertical', </span> <span style="font-size: 13px;">} </span> <span style="font-size: 13px;">"#tab1":{ </span>
<span style="font-size: 13px;"> title:"Remote Read", </span> <span style="font-size: 13px;"> icon:"KS_nav_ui.png", </span> <span style="font-size: 13px;">}, </span> <span style="font-size: 13px;">"#tab2":{ </span>
<span style="font-size: 13px;"> title:"Remote Insert", </span> <span style="font-size: 13px;"> icon:"KS_nav_ui.png", </span> <span style="font-size: 13px;">}, </span> <span style="font-size: 13px;">"#tableView":{ </span>
<span style="font-size: 13px;"> headerTitle : 'To do list', </span> <span style="font-size: 13px;">}, </span> <span style="font-size: 13px;">"#inserTxtF":{ </span>
<span style="font-size: 13px;"> color:"#336699", </span> <span style="font-size: 13px;"> top:"10dp", </span> <span style="font-size: 13px;"> left:"10dp", </span> <span style="font-size: 13px;"> width:"290dp", </span> <span style="font-size: 13px;"> height:"50dp", </span> <span style="font-size: 13px;">}, </span> <span style="font-size: 13px;">"#insertBtn":{ </span>
<span style="font-size: 13px;"> title:"Insert", </span> <span style="font-size: 13px;"> top:"10dp", </span> <span style="font-size: 13px;"> left:"180dp", </span> <span style="font-size: 13px;"> width:"124dp", </span> <span style="font-size: 13px;"> height:"50dp", </span> <span style="font-size: 13px;">}, </span> |
Index.tss is used styling the UI, feel free to play around with it and change the visuals, it is useful to know that the ‘#’ symbol match with every id tag in the xml file.
Following the “keep it simple” principle, and for purposes of this tutorial, I will use a Controller as a Model because I am doing model stuff like connecting to the service the POST and GET HTML forms but using all on of them in the controller. But is a good programing practice to use a model or use separate modules in the library folder.
So go to “index.js” file and fill it with the code below.
<span style="font-size: 13px;">//Array to store the data from the todo list</span><span style="font-size: 13px;"> </span> <span style="font-size: 13px;"> var dataArray = []; </span> <span style="font-size: 13px;"> //We execute the function to show the data for the first view </span> <span style="font-size: 13px;"> getTodoList(); </span> <span style="font-size: 13px;"> function getTodoList () { </span>
<span style="font-size: 13px;"> //function to use HTTP to connect to a web server and transfer the data. </span> <span style="font-size: 13px;"> var sendit = Ti.Network.createHTTPClient({ </span>
<span style="font-size: 13px;"> onerror: function(e){ </span>
<span style="font-size: 13px;"> Ti.API.debug(e.error); </span> <span style="font-size: 13px;"> alert('There was an error during the connection'); </span>
<span style="font-size: 13px;"> }, </span> <span style="font-size: 13px;"> timeout:1000, </span> <span style="font-size: 13px;"> }); </span> <span style="font-size: 13px;"> //Here you have to change it for your local ip </span> <span style="font-size: 13px;"> sendit.open('GET', 'http://192.168.0.120/read_todo_list.php'); </span>
<span style="font-size: 13px;"> sendit.send(); </span> <span style="font-size: 13px;"> //Function to be called upon a successful response </span> <span style="font-size: 13px;"> sendit.onload = function(){ </span>
<span style="font-size: 13px;"> var json = JSON.parse(this.responseText); </span> <span style="font-size: 13px;"> var json = json.todo; </span> <span style="font-size: 13px;"> //if the database is empty show an alert </span> <span style="font-size: 13px;"> if(json.length == 0){ </span>
<span style="font-size: 13px;"> $.tableView.headerTitle = "The database row is empty"; </span> <span style="font-size: 13px;"> } </span> <span style="font-size: 13px;"> //Emptying the data to refresh the view </span> <span style="font-size: 13px;"> dataArray = []; </span> <span style="font-size: 13px;"> //Insert the JSON data to the table view </span> <span style="font-size: 13px;"> for( var i=0; i<json.length; i++){ </span>
<span style="font-size: 13px;"> var row = Ti.UI.createTableViewRow({ </span>
<span style="font-size: 13px;"> title: json[i].todo, </span> <span style="font-size: 13px;"> hasChild : true, </span> <span style="font-size: 13px;"> }); </span> <span style="font-size: 13px;"> dataArray.push(row); </span> <span style="font-size: 13px;"> }; </span> <span style="font-size: 13px;"> $.tableView.setData(dataArray); </span> <span style="font-size: 13px;"> }; </span> <span style="font-size: 13px;"> }; </span> <span style="font-size: 13px;"> function insertData(){ </span>
<span style="font-size: 13px;"> //if there is something in the textbox </span> <span style="font-size: 13px;"> if($.inserTxtF.value != "" && $.inserTxtF.value != null){ </span>
<span style="font-size: 13px;"> var request = Ti.Network.createHTTPClient({ </span>
<span style="font-size: 13px;"> onload:alert("Your chore has been submitted"), </span>
<span style="font-size: 13px;"> onerror: function(e){ </span>
<span style="font-size: 13px;"> Ti.API.debug(e.error); </span> <span style="font-size: 13px;"> alert('There was an error during the conexion'); </span>
<span style="font-size: 13px;"> }, </span> <span style="font-size: 13px;"> timeout:1000, </span> <span style="font-size: 13px;"> }); </span> <span style="font-size: 13px;">//Request the data from the web service, Here you have to change it for your local ip </span> <span style="font-size: 13px;"> request.open("POST","http://192.168.0.120/insert_todo_list_element.php"); </span>
<span style="font-size: 13px;"> var params = ({"id": "0" ,"todo": $.inserTxtF.value,}); </span>
<span style="font-size: 13px;"> request.send(params); </span> <span style="font-size: 13px;"> } </span> <span style="font-size: 13px;"> else{ </span>
<span style="font-size: 13px;"> alert("Please write something in the textbox"); </span>
<span style="font-size: 13px;"> } </span> <span style="font-size: 13px;"> $.inserTxtF.value = ""; </span> <span style="font-size: 13px;"> }; </span> <span style="font-size: 13px;"> $.mainTabGroup.open();</span> |
In order for this to work, you’ll notice that there’s something missing. You’re right, if you can see this 2 lines of the code:
<span style="font-size: 13px;">sendit.open('GET', 'http://192.168.0.120/read_todo_list.php');</span>
<span style="font-size: 13px;">request.open("POST","http://192.168.0.120/insert_todo_list_element.php");</span>
|
These lines of code refer to two .php files which are stored in the WWW folder of your Wamp server. Navigate to that folder, it is usually C:wampwww, once in there create two .php files with your favorite text editor.
The first one will be called:
read_todo_list.php
<span style="font-size: 13px;"><?php</span> <span style="font-size: 13px;">$username="YOU_USERNAME"; //------------your username usually root</span> <span style="font-size: 13px;">$password="YOU_PASSWORD";//---------your password</span> <span style="font-size: 13px;">$database="todolist";//----the name of the database</span> <span style="font-size: 13px;">$mysqli = new mysqli("localhost",$username,$password,$database);</span>
<span style="font-size: 13px;">if (mysqli_connect_errno()) {</span>
<span style="font-size: 13px;"> printf("Can't connect to SQL Server. Error Code %sn", mysqli_connect_error($mysqli));</span>
<span style="font-size: 13px;"> exit;</span> <span style="font-size: 13px;">}</span> <span style="font-size: 13px;">$json = array();</span> <span style="font-size: 13px;">if($result = $mysqli->query("select todo from todolist.mylist")) {</span>
<span style="font-size: 13px;"> while ($row=$result->fetch_assoc()) {</span>
<span style="font-size: 13px;"> $json[]=array(</span> <span style="font-size: 13px;"> 'todo'=>$row['todo'],</span> <span style="font-size: 13px;"> );</span> <span style="font-size: 13px;"> }</span> <span style="font-size: 13px;">}</span> <span style="font-size: 13px;">$result->close();</span> <span style="font-size: 13px;">header("Content-Type: text/json");</span>
<span style="font-size: 13px;">echo json_encode(array( 'todo' => $json )); </span> <span style="font-size: 13px;">$mysqli->close(); </span> <span style="font-size: 13px;">?></span> |
And the second one will be called:
insert_todo_list_element.php
<span style="font-size: 13px;"><?php</span> <span style="font-size: 13px;">$username="YOU_USERNAME"; //------------your username usually root</span> <span style="font-size: 13px;">$password="YOU_PASSWORD";//---------your password</span> <span style="font-size: 13px;">$database="todolist";//----the name of the database</span> <span style="font-size: 13px;">$mysqli = new mysqli("localhost",$username,$password,$database);</span>
<span style="font-size: 13px;">if (mysqli_connect_errno()) {</span>
<span style="font-size: 13px;"> printf("Can't connect to SQL Server. Error Code %sn", mysqli_connect_error($mysqli));</span>
<span style="font-size: 13px;"> exit;</span> <span style="font-size: 13px;">}</span> <span style="font-size: 13px;">$todo = isset($_POST['todo']) ? $_POST["todo"] : "";</span> <span style="font-size: 13px;">$insert="INSERT INTO todolist.mylist (todo) VALUES ('$todo')"; </span>
<span style="font-size: 13px;">$mysqli->query($insert);</span> <span style="font-size: 13px;">printf("Thanks for the new element! n");</span>
<span style="font-size: 13px;">$mysqli->close(); </span> <span style="font-size: 13px;">?></span> |
NOTE: You can download the code above in a ZIP file by clicking here.
Final thoughts
This is an example of how to integrate the elements in alloy and use a remote database. Hope this little tutorial help you in your coding. If you have any questions, let us know and share it with your friends. All of us at iTexico will continue bringing you more tutorials.
About the author
Mario Galván is a software engineer and mobile developer with more than 2 years of experience in software development with specialty in mobile and backend.


Post Your Comment Here