
Mobile App Tutorial: Backbone Models Database with Titanium Alloy
Since the Alloy plug-in release, Titanium development has been extremely simple and fast. In this tutorial I will show you how to implement a local database with backbone models in 5 simple steps.

Considerations before starting this tutorial:
1) Have installed the latest version of Titanium Studio.
2) Have a basic knowledge of how to use Titanium/Alloy MVC framework.
NOTE: This tutorial has been created using an OSX environment and Titanium 3.1.1 SDK version.
Step 1
Go ahead and create a new mobile app project (“Default Alloy Project”) called it ToDoList.
Step 2
Let’s create a new model in the "models" folder inside "app" folder; let’s call it toDoList.js
1.- Right click on the Models folder > Create Alloy Model
<span style="font-family: 'courier new', monospace;">exports.definition = {</span>
<span style="font-family: 'courier new', monospace;"> config : {</span>
<span style="font-family: 'courier new', monospace;"> columns : {</span>
<span style="font-family: 'courier new', monospace;"> "id_toDoList": "INTEGER PRIMARY KEY AUTOINCREMENT",</span> <span style="font-family: 'courier new', monospace;"> "value" : "TEXT",</span> <span style="font-family: 'courier new', monospace;"> "hasCheck": "BOOLEAN"</span> <span style="font-family: 'courier new', monospace;"> },</span> <span style="font-family: 'courier new', monospace;"> adapter : {</span>
<span style="font-family: 'courier new', monospace;"> type : "sql",</span> <span style="font-family: 'courier new', monospace;"> collection_name : "toDoList",</span> <span style="font-family: 'courier new', monospace;"> idAttribute: "id_toDoList",</span> <span style="font-family: 'courier new', monospace;"> }</span> <span style="font-family: 'courier new', monospace;"> }</span> <span style="font-family: 'courier new', monospace;">}</span> |
Step 3
The next step is creating the UI, go to the index.xml file and insert this code:
<Alloy> <em><!-- Instance of the model --></em> <Collection src="toDoList" /> <Window class="container"> <TextField id="tfInsert"></TextField> <Button id="btnInsert" >Insert</Button> <em><!-- Specifies the collection singleton or instance to bind to the table. --></em> <TableView id="tbToDoList" dataCollection="toDoList"> <em><!-- rowId="{id_toDoList} is a custom property in order to have a reference to the primary key of the records --></em>
<TableViewRow id="listRow" rowId="{id_toDoList}" hasCheck="{hasCheck}">
<View id="componentView"> <em><!-- text="{value} is the value of the record of the database --></em>
<Label id="lblValue" text="{value}"></Label>
</View> </TableViewRow> </TableView> </Window> </Alloy> |
Step 4
Go to the index.css and insert this code:
".container": {
backgroundColor:"white" }, "#tfInsert":{
width:"290dp", height:"40dp", top:"10dp", left:"15dp", borderRadius:"6dp", borderColor:"black", borderWidth:"1dp", maxLength:"80dp", paddingLeft:"10dp", textAlign:Titanium.UI.TEXT_ALIGNMENT_LEFT, clearOnEdit:true }, "#btnInsert":{
right:"15dp", top:"60dp", width:"60dp", height:"30dp" }, "#tbToDoList":{
widht:Ti.UI.FILL, height:Ti.UI.FILL, top:"100dp" }, "#listRow":{
hasCheck:true, width:Ti.UI.FILL, height:"40dp", hasCheck: false }, "#componentView":{
width:"90%", height:Ti.UI.FILL, left:"10dp" }, "#lblValue":{
left:0, color:"black", font: {
fontFamily: "HelveticaNeue", fontSize: "12sp" } } |
Step 5
Here’s the fun part the index.js file:
<em>//Opens the window</em> $.index.open();
<em>//</em> $.btnInsert.addEventListener('click',function(e){
<em>//Hides the keyboard in iOS</em> $.tfInsert.blur(); <em>//if there is something in the textbox</em> if($.tfInsert.value != ""){
<em>//This is how we are creating an instance of a model</em> var listModel = Alloy.createModel("toDoList", {
<em>//with out custom parameters</em> value: $.tfInsert.value, hasCheck:false }); <em>//This is how we save a model to our databaseif the model already exists, the save will be an "update".</em> listModel.save(); <em>//Resets the model's state from the database</em> Alloy.Collections.toDoList.fetch(); } else{
alert("Please fill out the text field above.");
} });
<em>//Check/Uncheck</em> $.tbToDoList.addEventListener('click',function(e){
<em>//Factory method for instantiating a Backbone collection of model objects</em> var recoverDatabase = Alloy.createCollection("toDoList");
<em>//We need the database to iterate through it</em> recoverDatabase.fetch({query:"SELECT * FROM toDoList"});
for(var i=0; i<recoverDatabase.length;i++){
<em>//This is how we are getting the value of id:toDoList .at(i).get("id_toDoList")</em>
if(recoverDatabase.at(i).get("id_toDoList") == e.row.rowId){
var table = Alloy.createCollection("toDoList");
<em>//e.row.rowId is a custom property created in the .xml file that contains the primary key of every value in the database</em> table.fetch({query:"SELECT * FROM toDoList where id_toDoList = " + e.row.rowId });
<em>//if the query returned with more than 0 rows</em> if(table.length > 0){
<em>//if the record(hasCheck) of the column is false</em> if(table.at(0).get("hasCheck") == false){
e.row.hasCheck = true; <em>//This is how we set a value to the database</em> table.at(0).set({
id_toDoList:e.row.rowId, <em>//then we set it to true</em> hasCheck:true }); table.at(0).save(); } else{
<em>//if not we set it to false</em> e.row.hasCheck = false; table.at(0).set({
id_toDoList:e.row.rowId, hasCheck:false }); table.at(0).save(); } <em>//Get the latest database state</em> Alloy.Collections.toDoList.fetch(); } } } });
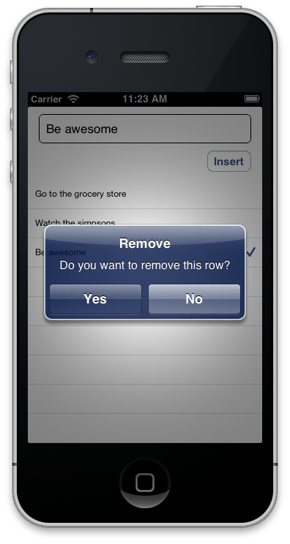
<em>//if we do a longpress we can delete the row</em> $.tbToDoList.addEventListener('longpress',function(e){
var tableViewEvent = e.row; var alertDialog = Titanium.UI.createAlertDialog({
title: 'Remove', message: 'Do you want to remove this row?', buttonNames: ['Yes','No'], cancel: 1 }); alertDialog.show();
alertDialog.addEventListener('click', function(e) {
if (e.index == 0) { <em>// clicked "YES"</em>
removeRow(tableViewEvent); } else if (e.index == 1) { <em>// clicked "NO"</em>
} }); });
function removeRow (_row) {
var recoverDatabase = Alloy.createCollection("toDoList");
recoverDatabase.fetch({query:"SELECT * FROM toDoList"});
for(var i=0; i<recoverDatabase.length;i++){
if(recoverDatabase.at(i).get("id_toDoList") == _row.rowId){
var table = Alloy.createCollection("toDoList");
table.fetch({query:"SELECT * FROM toDoList where id_toDoList = " + _row.rowId });
if(table.length > 0){
<em>//To remove a row from the database we use destroy()</em> table.at(0).destroy(); Alloy.Collections.toDoList.fetch(); } } } }
<em>//Resets the model's state from the database useful if you'd like to ensure that you have the latest database state.</em> Alloy.Collections.toDoList.fetch(); |
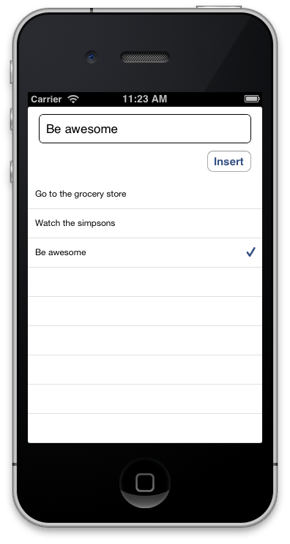
So this is what you will see in your mobile app project:
Also, you can pull all the code to your existing mobile app project, with github. Just click here!
Final thoughts
This is a really quick example of mobile app development on how to integrate backbone models with titanium in alloy. Hope this little tutorial helped you in your coding. If you have any questions, let us know. Feel free to share this software development tutorial with your friends. All of us at iTexico will continue bringing you more software and mobile app development tutorials, share best practices, and other industry news as part of our blog series.
About the author
Mario Galván is an iTexico Software Engineer and Mobile Developer with ~2 years of experience with Titanium development for mobile application development. He currently works as a Software Engineer at iTexico developing multiple mobile app projects for clients.


Post Your Comment Here